
Boxwoods, classic, timeless, evergreen, but there are so many! How do you plant and how to grow them?
Let’s find which one, or which few are best for what you want and answer some of the most common questions. At the end of this post is a link to a living spreadsheet covering the different types and varieties of boxwoods to help you choose.
If it was a perfect garden for boxwoods, it would be…
- Well-drained
- Fertile
- pH between 6.8-7.5
- Rich in organic matter
- Shaded in the afternoon, even in the winter
- Hardiness zone (US) between 5 and 8 (Winter temperatures drop down between -20 F (-29 C) and -10 T (-5 C).
Boxwoods are shallow-rooted, susceptible to root damage if the soil is cultivated. Mulch up to 3″ beyond the branch tips to conserve soil moisture, buffer soil temperature changes and reduce plant competition. Water deeply but less frequently after planting until established, and during a drought. When established, boxwoods are drought resistant, especially in shaded areas, but stressed plants are more susceptible to insects and disease. Most boxwoods are stressed in the afternoon full sun.
How To Grow Boxwood:
How much sun? How much shade?
How much water?
What type of soil?
What climates does boxwood grow in?
How to plant boxwood plants?
-Sandy, fast-draining, poor or drought-prone soils
-Heavy, clay, or slower draining soils
How to plant boxwood hedges.
Pests and diseases of boxwood plants
How and when to prune or trim boxwood plants
Which boxwood variety to choose?

How To Grow Boxwood:
How much sun? How much shade?
How much sun and conversely how much shade a boxwood can grow in does depend on your climate and the rest of the conditions it is growing in. The more ideal everything else is, the more leeway you have in sun vs shade. That goes for just about all of the growth factors for all plants. There is a bell curve around the perfect conditions. The perfect pH, the perfect soil type, the perfect climate conditions. As your garden approaches those perfect conditions, there are acceptable conditions on either side of the sweet spot. Such as pH, boxwood like pH 6.8-7.5. The sweet spot would be right in the middle.

How much water?
Boxwoods are very drought tolerant once established. A boxwood is more likely to have trouble with being too wet than the other way around unless you have very sandy soils, and you know who you are…the ones who seem like you can grow only cacti and succulents.
When boxwoods are getting established from planting or transplanting, water deeply, not frequently. How much and how often depends on your soil. This is how to tell how much is enough.
Just because it rains DOES NOT mean your newly planted shrubs have been watered. The best way to be sure is, touch the soil. Yes., reach down and actually touch it. Is it dry 2 knuckles deep? If yes, water deeply. How much? Again, it depends on your soil. Test it. Water until you feel you have watered enough for the draining water to seep all the way down to the bottom of the root ball you planted.
Actually take a trowel, dig down as deep as the root ball that you transplanted is…is it wet? Probably not, don’t be discouraged, take how much, volume, or how long your irrigation was on, and change the amount, or time run, to how long it would take to finish wetting the soil down to the bottom of that root ball.
You will only need to do this once. Once you determine how much or long you need to irrigate, then you know.
Fortunately, after doing this once, write it down somewhere. Yes, write it down in the same spot you have the varieties of plants you planted. Trust me, you will thank me later. The next time you plant anything (or next year) you will not have to do the process of determining how much water will properly, deeply, irrigated newly planted shrubs.
Now for how often to water.
Again, touch the soil, check it 3X a week, feel for it to be dry, not slightly damp, but DRY 2 knuckles down. If you feel NO moisture. Then water deeply. And how much is deeply was determined by the first time you did this, the volume or time it took the water to reach the bottom depth of the root ball.
A pattern will develop. 2X a week, 3X a week, or so. If the weather changes too much warmer, or much cooler, check the soil regularly to see if you need to increase or decrease your watering.
What type of soil?
Boxwoods are very tolerant of a wide range of soil textures. Soils mixing sand, silt, and clay. Boxwoods will thrive as long as the soil is well-drained, with no standing water. Also, a mix very high in either clay or sand will challenge boxwoods (as most plants). Adding organic matter helps both too sandy soils and too high in clay soils.
The pH needs to be between 6.5 and 7.2. If a soil test shows your pH to be below 6.5, add lime, depending on your local conditions on which type, ask your local extension service, or local independent garden center for their recommendation.
If your pH is too high, reduce it with elemental garden sulfur, please do not use aluminum sulfate, university studies have found the rhododendron family to be susceptible to aluminum toxicity from accumulated aluminum. Who knows what you might want to plant in the future? Why put limits on the future?
What climates does boxwood originate from?
The best way to find out what climates a plant prefers is to find out where it originates from. Boxwoods are native in temperate areas. Buxus sempervirens hail from areas such as western to Southern Europe, northern Morocco, northern African, and the northern Mediterranean to Turkey. (1)
Korean boxwood has a murkier origins history. What I can say is that they are native to Korea, Japan and sections of China. (2), (3), (4)
How to plant boxwood plants?
If you are planting a hedge, feel free to jump down to the image of an arrow. Those instructions are complete, relevant info has been repeated to keep organized.
Transplanting, digging up out of garden soil and replanting, is best in the late fall or early spring. Planting boxwoods that are containers grown (pot grown), can be planted any time the ground is not frozen. Container-grown plants have all of their roots contained and you would not be cutting away a large portion of the active root system, this is why there is the difference. A plant is happier in the ground where the temperatures change slowly, and moisture is buffered, than in a plastic pot out of the ground.
Dig the hole, at least, twice as wide as the root ball.
Hole depth will depend on your soil type.
–Sandy, fast-draining, poor or drought-prone soils, plant as deep as the boxwood is in the container currently. Amend your soil. Compost, peat moss, bagged garden soil, soil conditioner are all excellent choices. Backfill when planting with a mix made from ⅓ amendment to ⅔ soil dug from the hole.
When backfilling, stop about ⅓ the way up and put ½ the recommended amount of an all-purpose, slowly released, balanced fertilizer. When almost full, add the other half, and top off with the last of the soil so the fertilizer doesn’t get washed away.
A good granular organic like Espoma Plant Tone or Garden Tone, or a 10-10-10 will be fine.
The exact numbers on the fertilizer are not the important part, it is the ratio relationship between the 3 fertilizer numbers. As long as none of the 3 numbers is more than a couple of numbers away from any of the other 3 numbers, you will be just fine. Click here to read more about fertilizers, and why I do not push a specialized specific ‘magic’ formula of nutrient numbers.
Take extra care to mulch at least 3 inches deep with an organic mulch to conserve moisture and stabilize soil temperatures. Extend mulch out at least 3 inches beyond the drip line of the plant.
–Heavy, clay, or slower draining soils, make the final depth should be so the crown of the root ball is slightly above the surrounding garden soil. This ensures it does not end up sunken from the soil settling after transplanting, and ensures drainage away from the root ball.
Boxwood needs well-drained soil and will not tolerate soggy feet. Also, at the bottom of the hole, have the root ball rest on top of a mound. This is to give a place for the extra water, which is necessary to irrigate properly when planting, a place to go, to drain off to. This is so the root ball is not sitting in a teacup full of water made by the clay soil, rotting out the roots. A little inconvenience now. Makes all the difference in NOT having to dig up a rot rotted plant, rebuy, and replanting another. You will thank yourself!
Backfill with a mix of ⅓ soil conditioner (a mix of finer ground mulch and compost) and ⅔ soil dug from the soil. This is important. Do not backfill with a ‘perfect mix”. Use ⅔ native soil, what you dug from that hole. Otherwise, the boxwood might just act as if it was in a larger pot. The native soil is necessary for it to transition out into the rest of the surrounding soil.
The soil conditioner will add the needed porosity, drainage, and lightness to the soil for now, and add valuable organic matter as it breaks down over time.
When backfilling, stop about ⅓ the way up and put ½ the recommended amount of an all-purpose, slowly released, balanced fertilizer. When almost full, add the other half, and top off with the last of the soil so the fertilizer doesn’t get washed away.
A good granular organic like Espoma Plant Tone or Garden Tone or a 5-5-5 will be fine. Soils with a lot of clay will naturally hold a lot more fertility and will need less fertilizer.
The exact numbers on the fertilizer are not the important part, it is the ratio relationship between the 3 fertilizer numbers. As long as none of the 3 numbers is more than a couple of numbers away from any of the other 3 numbers, you will be just fine. Click here to read more about fertilizers, and why I do not push a specialized specific ‘magic’ formula of nutrient numbers.
Mulch with a few inches of organic mulch to protect the shallow root system as it grows from the root ball. Boxwoods are sensitive to cultivation near their roots. Mulch so you do not need to.
Regardless of your soil types, water in deeply. When you think you have watered it in deeply, do it one more time. Check on your boxwood, and ACTUALLY TOUCH the soil to determine if it needs water yet or not. Click here to go to exactly how to figure out if you need to water again.
Just because it rains DOES NOT mean your boxwoods have been watered. Is it dry 2 knuckles deep? If yes, water deeply. How much? Again, it depends on your soil. Test it. Water until you feel you have watered enough for the draining water to seep all the way down to the bottom of the root ball you planted
Water deeply every year, just before you expect weather cold enough to freeze up the soil.
If you want to skim down to the specific section you need, go ahead, some of the relevant information is duplicated in the planting a hedge. Feel free to jump down to the next picture to pick up reading again.
How to plant boxwood hedges.
For a hedge, find out how wide you can expect the variety of boxwood to grow. Then decide how much patience you have. If you are planting a tall hedge for 10 years from now hedge, plant as far apart, on center (from trunk to trunk), as the variety is expected to get in 10 years. Many of the plant tags found in the US and information published by US nurseries tend to report sizes as what is expected in 10 years. (Not how big it can eventually get…if a plant isn’t growing, it’s dying.)
If you want your hedge, well, now, measure how wide the plants you are planting are, and plant that far apart on center. Do not eyeball this, or just dig one hole, plant one, and set the plant next to it, and dig. I repeat, do not. It will look amateurish and ‘off’.
Mark off your line. If straight, put in a stake at one end, and a stake at the other and run a line. If a curve, then lay out a watering hose and work with the curve until it looks right. Mark the line or hose. Use spray chalk or paint (make sure you have the kind that sprays while the can is upside down), scrape a shallow trench if the bed is already prepared, remove sod if needed, carefully to mark the line. You get the idea, use your imagination and what you have on hand.
Remove sod if needed.
You can either dig individual holes or dig a trench. Depending on what size boxwoods you are planting, and if you are putting in an instant gratification hedge, a 10-year hedge, or something in between, will determine which you will do. Either one is perfectly fine. The closer the boxwoods are getting planted, the more sense and easier a trench becomes.
Dig the hole, or trench at least twice as wide as the root ball.
The depth will depend on your soil type. If using a trench, dig the entire trench, layout plants beside trench and MEASURE, and space out, no estimating, eyeballing, or guessing distance. Either mark it out or use a stick to keep it consistent. Place boxwood in, hold upright straight and backfill as described.
-Sandy, fast-draining, poor or drought-prone soils, plant as deep as the boxwood is in the container currently. Amend your soil. Compost, peat moss, bagged garden soil, soil conditioner are all excellent choices. Backfill when planting with a mix made from ⅓ amendment to ⅔ soil dug from the hole.
When backfilling, stop about ⅓ the way up and put ½ the recommended amount of an all-purpose, slowly released, balanced fertilizer. When almost full, add the other half, and top off with the last of the soil so the fertilizer doesn’t get washed away.
A good granular organic like Espoma Plant Tone or Garden Tone, or a 10-10-10 will be fine.
The exact numbers on the fertilizer are not the important part, it is the ratio relationship between the 3 fertilizer numbers. As long as none of the 3 numbers is more than a couple of numbers away from any of the other 3 numbers, you will be just fine. Click here to read more about fertilizers, and why I do not push a specialized specific ‘magic’ formula of nutrient numbers.
Take extra care to mulch at least 3 inches deep with an organic mulch to conserve moisture and stabilize soil temperatures. Extend mulch out at least 3 inches beyond the drip line of the plant.
–Heavy, clay, or slower draining soils, make the final depth should be so the crown of the root ball is slightly above the surrounding garden soil. This ensures it does not end up sunken from the soil settling after transplanting, and ensures drainage away from the root ball.
Boxwood needs well-drained soil and will not tolerate soggy feet. Also, at the bottom of the hole, have the root ball rest on top of a mound. This is to give a place for the extra water, which is necessary to irrigate properly when planting, a place to go, to drain off to. This is so the root ball is not sitting in a teacup full of water made by the clay soil, rotting out the roots. A little inconvenience now. Makes all the difference in NOT having to dig up a rot rotted plant, rebuy, and replanting another. You will thank yourself!
Backfill with a mix of ⅓ soil conditioner (a mix of finer ground mulch and compost) and ⅔ soil dug from the soil. This is important. Do not backfill with a ‘perfect mix”. Use ⅔ native soil, what you dug from that hole. Otherwise, the boxwood might just act as if it was in a larger pot. The native soil is necessary for it to transition out into the rest of the surrounding soil.
The soil conditioner will add the needed porosity, drainage, and lightness to the soil for now, and add valuable organic matter as it breaks down over time.
When backfilling, stop about ⅓ the way up and put ½ the recommended amount of an all-purpose, slowly released, balanced fertilizer. When almost full, add the other half, and top off with the last of the soil so the fertilizer doesn’t get washed away.
A good granular organic like Espoma Plant Tone or Garden Tone or a 5-5-5 will be fine. Soils with a lot of clay will naturally hold a lot more fertility and will need less fertilizer.
The exact numbers on the fertilizer are not the important part, it is the ratio relationship between the 3 fertilizer numbers. As long as none of the 3 numbers is more than a couple of numbers away from any of the other 3 numbers, you will be just fine. Click here to read more about fertilizers, and why I do not push a specialized specific ‘magic’ formula of nutrient numbers.
Mulch with a few inches of organic mulch to protect the shallow root system as it grows from the root ball. Boxwoods are sensitive to cultivation near their roots. Mulch so you do not need to.
Regardless of your soil types, water in deeply. When you think you have watered it in deeply, do it one more time. Check on your boxwood, and ACTUALLY TOUCH the soil to determine if it needs water yet or not.
Just because it rains DOES NOT mean your boxwoods have been watered. Is it dry 2 knuckles deep? If yes, water deeply. How much? Again, it depends on your soil. Test it. Water until you feel you have watered enough for the draining water to seep all the way down to the bottom of the root ball you planted
Water deeply every year, just before you expect weather cold enough to freeze up the soil.
Start to prune your boxwood hedge, closer and closer into a hedge shape. Prune in the spring just as you pass the last expected frost until new growth starts. The next pruning window is after the new growth has matured. The final pruning window is a month before the first frosts are expected. Now, you do not need to prune 3 times a year, these are just the best windows to prune to choose from. If you desire a more chiseled edge to your boxwood hedge, feel free to touch up during all of these windows.
Whatever shape you choose, it is best to have the lower edge at least slightly wider than the top edge to allow light to best reach the lower edge’s leaves. More important the less sun the entire hedge is in. Just about any shape is possible, and I have seen some amazing shapes. As far as the plant is concerned, why spend the energy growing and maintaining leaves where they are not as efficient gathering the sun energy as others on the plant. So, knowing this, it is simpler to plan and prune with your plant’s natural inclinations rather than fighting it.
Pests and diseases of boxwood plants.
Diseases
Boxwood Blight.
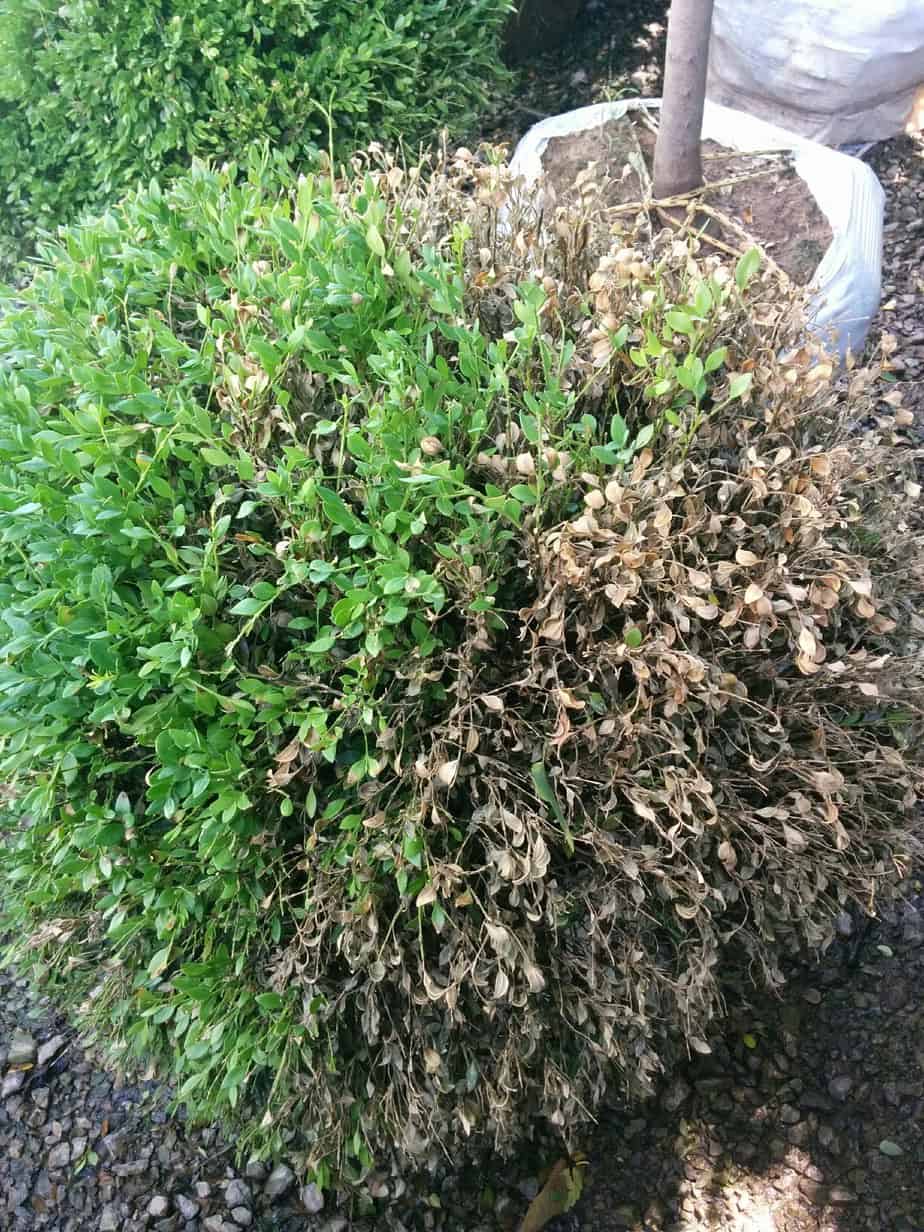
Boxwood blight is showing up in more and more areas. It shows as dead and defoliated entire sections, to the entire plant, of the boxwood. There is no cure, the plant must be removed carefully as to not spread the disease. Bag and remove entirely, do not compost or chop into mulch. To prevent Boxwood Blight, buy your plants from certified blight-free sources, maintain vigorous plants with good air circulation.
Pests
Boxwoods are deer resistant. That is great for those of us who have hungry deer munching their way through our gardens in the winter. Deer just don’t like to eat them.
Boxwoods major pests are:
-Boxwood leaf miner. Larvae grow and feed between the upper and lower layers of the leaf. This protects the feeding larvae from natural predators and topical pesticides. Pesticide application has to be carefully timed to catch the adults emerged and laying new eggs. This usually happens at the same time as Weigela is in bloom (after most spring frosts, but may occasionally be caught by late frost). All other times the insect is protected by the leaf itself. You can see this in the blister or pillowing of the leaves where they have been feeding.
–Soil Nematodes
Boxwoods can be susceptible to soil nematodes, plant-parasitic, microscopic, unsegmented roundworms that feed on plant root tips. Nematodes are present in most soils and are unavoidable for the most part. The key is to have the boxwoods healthy and growing in conditions that they thrive in. This will have the boxwood thriving so that any damage is minimal and easily overcome.
Nematode infestations damaging to the plant will show up as signs of root damage, or water stress. Which makes sense because if the roots are damaged, the plant is not getting the water it needs, and will show it by the same signs as if in drought.
Leaves will bronze, and be a paler color green than regularly, growth will be stunted, and the boxwood will start to decline in health. This is a slow process, over a few seasons, not suddenly, over a couple of weeks.
Bronzing is also something that happens commonly during the winter. This is a sign that the water is not available for the boxwood to uptake. Frozen or tied up as snow. Either way, not available and it shows as bronzing. To help reduce bronzing of boxwood during the winter, plant where there is some shade in the afternoon, but also, water deeply before freezing weather is expected.
Nematode damage is confirmed when the boxwood is dug up after succumbing to the nematode stresses. The root system will show the symptomatic witches broom pattern of damaged roots, triggering side roots growing above nematode damage, which gets infested, and grows lateral roots above that damage, and so on.
Do not plant new boxwoods in soil that boxwoods succumbed to nematodes. The nematode population will be too high. Try planting holly instead which are root nematode resistant. For a similar look, try a boxwood leaved variety such as Ilix ‘Soft Touch” or Ilix ‘Bordeaux’. Alternatively, plant grasses and/or marigolds for a few years until the nematode population decreases.
-Psyllids.
Suspect psyllids when the new growth grows cupped up like a bowl. They feed on the upper side of the leaves causing them to grow distorted.
–Boxwood Spider Mites, Eurytetranychus buxi
Mites are yellowish to green or tan to reddish in color, and very tiny. Just discernable to the eye IF you look very close, 1/64 of an inch (less than ½ of an mm).
A good test is to hold a white sheet of paper (typical copy paper, 8 ½ X 11 under a branch and hit the branch. If more than 15 mites were knocked off onto the paper, the infestation is enough to cause damage.
Mites suck the juices (think lifeblood of the plant), and also secrete saliva which causes damage to the leaf, leaving silvery or yellow stippling on the leaf. Too many and the surface of the leaf is ‘shaded’ by the silvery, or yellowish damage which reduces the growth and vigor of the plant.
There are labeled pesticides for mites, if going that route I like systemic pesticides for mites because they make the plant poisonous to the mites, stopping them in their tracks…after a few weeks delay while they reach effective levels in the plant. You can also control if not too severe of an infestation with daily sharp prays of water, be sure to focus on the undersides of the leaves, to knock them off. Also horticultural oil, in temperatures between 45F – 85F (7C – 29C), be sure to coat the undersides of leaves too.
Same with insecticidal soaps.
Start early in the season and repeat regularly. Mites start hatching in May, and can up to 8 generations a year! Don’t wait for the problem to be too big before you act. Mite infestations are usually overlooked until they are very heavy.
How and when to prune or trim boxwood plants.
Prune your boxwoods with sharp, clean-cutting tools. Have some disinfection methods handy to disinfect between plants. This can be Lysol cleaner, Clorox wipes, disinfectant spray or a commercial disinfectant specialized for the horticultural industry. Just be sure to follow directions, in use, and also give a moment to either dry or rinse or wipe off before pruning so the chemicals are not dripping and pooling on your cutters when you are cutting into tender living growth. The idea is not to spread infection or spores from one plant to infect another, not to reproduce a surgical operation theatre. Even then, surgeons do not dip the knife into a disinfectant and then cut with disinfectant dripping off the knife, or do they disinfect between each cut. Just between patients… Ok, back to pruning….
Most boxwood benefits from thinning pruning to allow air and light into the plant. This makes a healthier plant, helps prevent disease, and encourages growth in the shrub. Not just a shell of growth on the outside, and empty inside.
Just pruning into balls, or squares, etc, without thinning pruning, encourages dense shell growth. This reduces airflow in the plant, making it perfect for fungus growth. This also makes it difficult for the plant to recover, visually, from a random branch injury.
Stray basketball, winter damage, the dog jumped in after a frisbee breaking a limb (yup, it happens ), leaving an empty, open spot.
If your boxwoods have dense shell growth, they may never look the same again. Time to replace, BUT if your boxwoods had been regularly pruned by thinning allowing that light inside the bush, then the boxwood has someplace already started to replace that growth. Plus the added benefit of not looking like a brown, dead gash in your boxwood from a distance, there is green there 🙂
Prune in the spring just as you pass the last expected frost until new growth starts. The next pruning window is after the new growth has matured. The final pruning window is a month before the first frosts are expected. Now, you do not need to prune 3 times a year, these are just the best windows to prune to choose from. If you desire a more chiseled edge to your boxwood hedge, feel free to touch up during all of these timing windows.
Whatever shape you choose, it is best to have the lower edge at least slightly wider than the top edge to allow light to best reach the lower edge’s leaves. More important the less sun the entire hedge is in. Just about any shape is possible, and I have seen some amazing shapes. As far as the plant is concerned, why spend the energy growing and maintaining leaves where they are not as efficient gathering the sun energy as others on the plant. So, knowing this, it is simpler to plan and prune with your plant’s natural inclinations rather than fighting it.
English Boxwood grows with a dense canopy, especially if trimmed or shaped yearly, and needs thinning every year or two to let air and sunlight inside to increase airflow, light and reduce humidity. This prevents fungal disease. Snip out tips of shoots, from your thumb to your hand in length, throughout the canopy of the shrub This can be done throughout the year except avoid late summer and fall. Pruning promotes growth, avoid promoting growth during a time your plants are settling down for the winter. You do not want to encourage fresh growth just in time to be nipped by early frosts.
Any other varieties which are sheared will have this dense canopy growth that will need to be thinned when it grows so thick that air and light are not reaching the inside of the plant.
Which boxwood variety to choose?
Click here to view a continually updated spreadsheet of Boxwood varieties.
-
What Japanese Maples Are Orange In The Fall?

Latin name zones height 10-15 yrs spring color summer color fall color leaf type tree shape ACER JAPONICUM ‘EMMETT’S PUMPKIN’ FULL MOON 5-9 12-15 org/over green dark green orange Palmatum
-
Fall Color For Ornamental Grasses

Here is what you can expect for color in Zone 6 in the US for fall favorite grasses. Pink Muhly Grass – Muhlenbergia capillaries The plumes give clouds of pink
-
Why Is My Japanese Maple Turning Green?
There are 3 reasons your Japanese maple is green: Variety Season Light Intensity and duration First, what variety of Japanese maple do you have? There are many varieties that are
(1) https://elischolar.library.yale.edu/cgi/viewcontent.cgi?article=1013&context=yale_fes_bulletin
(2) https://en.wikipedia.org/wiki/Buxus_microphylla (3)http://www.public.asu.edu/~camartin/plants/Plant%20html%20files/buxusmicrophyllajaponica.html
(4) https://www.mortonarb.org/trees-plants/tree-plant-descriptions/korean-boxwood